|
The
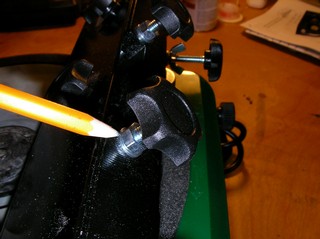
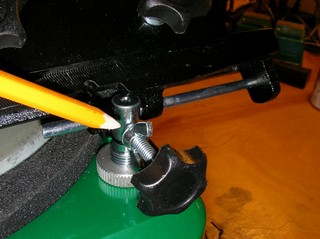
Woodcraft Horizontal Wet Grinder The Woodcraft HWG looks very similar to the Makita 9820. The wheels are a little smaller (7" instead of 8"). The knife jig is a little different (not much). But overall, the concepts are the same. The Woodcraft manual advises the user to study it (the manual) thoroughly before using the tool. The next page is an exploded diagram and parts listing, and that is about it. The Chinese don't excel at manuals. I was fortunate to find the Makita FAQ from Highland Hardware. If you're planning on using the Woodcraft HWG, I suggest you first read the Highland/Makita FAQ through several times. Here is a link: After reading that FAQ, you're going to want to grab a couple of parts from your Woodcraft machine and head to the hardware store. We need some additional parts. Specifically, five washers, four nuts, and a wing nut. The four nuts and four of the washers are added to the knife adjustment knobs on the knife holder. Once the knobs are positioned, these "jam" nuts are tightened against the knife holder to prevent the knobs from moving. Likewise, the wing nut and fifth washer are added to the angle adjust knob to prevent unwanted movement. Here are some pics...
Remove the wheel (it is reverse-threaded so turn clockwise to loosen) and dunk it in a container of water for about fifteen minutes (until it stops bubbling). Use the included 1000 wheel to start. The optional 400 wheel will grind too quickly and get a newbie in trouble fast. While you are waiting for the wheel to soak, you can fill the upper water tank of the sharpener with water, position the lower water tank behind the unit, and insert the water "hose." Once the wheel is done bubbling, reinstall it on the machine.
Getting started...
STEP
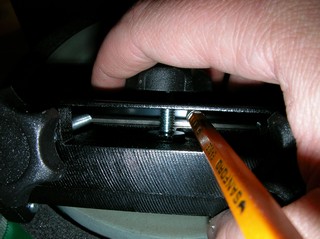
#1. Get your knives installed in the knife holder correctly. Next, set the tool rest to its initial position. I level the tool rest approximately 1/4" above the stone and lock the adjustment knobs. Then, I set the angle of the tool rest using a protractor set to 40-degrees (the bevel angle I use). You could also place one of your current knives on the tool rest and sight the angle. I like using a protractor so I don't have to worry about my angles drifting over time. After you have the angle set, reduce the height of the tool rest so there is only a 1/16" gap between the bottom of the tool rest and the top of the wheel. I sight the gap, and get it as straight as possible. Now, back the four knife adjustment knobs out of the knife holder enough that they won't touch the knife when inserted. Start with the smallest knife you have (as measured above) and center it in the knife holder bevel-side down. Adjust the hold-down knobs so the knife can still move somewhat freely. Center the knife holder with knife on the tool rest so the knife is centered on the wheel and not quite touching it. Apply a little additional pressure to the top of the knife holder with one hand. Now, use the eraser end of a pencil in your other hand to reach through the slot in the top of the knife holder and push the back of the knife so the bevel touches the stone (see photo below). Your knife's cutting edge should now be parallel to the stone. Tighten the knife hold-down knobs.
Note that if the two edges of a knife aren't parallel, you can compensate by shimming the appropriate side of your knife holder during this process. I'll write more about this later. But by way of example, say your knife measures .950 wide on one side and only .942 on the other. Use something .008 thick (an index card, for example) between the knife holder and the tool rest during the knife setting process. Place the shim on the side of the rest with more knife to grind (the .950 side). When you're done grinding, you'll have a knife with nice, parallel edges. This shim is only used during the knife setting process, remove it before grinding.
Step
#2: Get your tool rest adjusted so you're only using the
right-hand side of the wheel to grind, and so you're not grinding too
much steel.
Step
#3: Use the proper left to right technique for getting straight
and consistent knives. Lift the knife holder or rotate it back on the tool rest during the return stroke. You normally shouldn't grind back and forth, only left to right. You will normally take a full stroke of the knife with each pass. Initially, I suggest checking your work (by observing the knife) after every few strokes. You may notice that one part of the knife is grinding faster than the rest. Adjust your technique and try a few more strokes. You can adjust your left to right speed, starting and finishing position, and downward pressure to compensate for uneven grinding. Note that back and forth grinding can be employed to remove large amounts of material, but it can be a bit tricky as the knife can receive twice as much grinding at the points where you reverse direction as it does in the middle (think spray painting). When you're done with your first knife, carefully turn the positioning knobs on the back of the holder down so they kiss the knife. Use the nuts installed earlier to lock these in place. Remove your knife, clean and inspect (measure) it. If it looks good, insert your next knife in the holder in the same position, clamp it, and continue grinding. ***** That's it for now. I'll try to simplify this as much as possible during the next couple of weeks, and perhaps add a little more information on shimming, etc. Don't hesitate to E-Mail me with questions (phil@cgallery.com) or let me know if you have a better way.
--Phil
This page has
been viewed |