News:

SMF - Just Installed!

Main Menu
Menu

Show posts

This section allows you to view all posts made by this member. Note that you can only see posts made in areas you currently have access to.

Show posts Menu

Messages - guy48065

#1
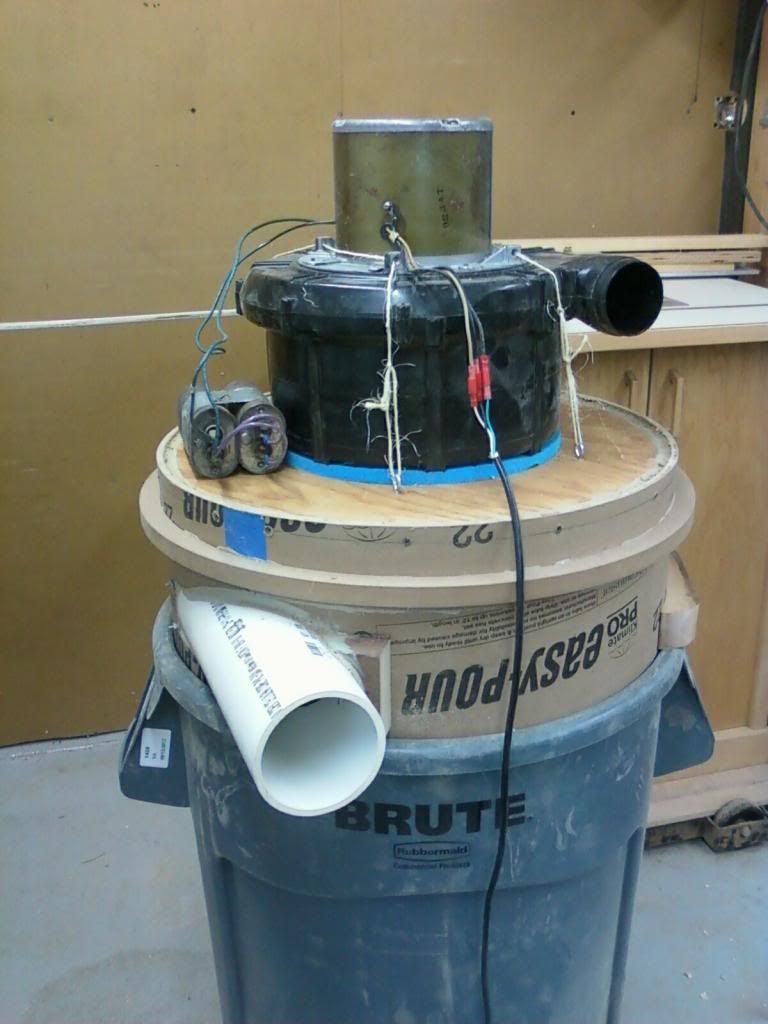
I'm a little late to the party but I'll post just to add a materials option.  I made the chamber sides from a 12" long piece of a 22" diameter concrete form.  A local concrete & stone supply sold it to me for about $6, it's nearly 1/4" thick and easy to work with.  I had to slit it up the side and remove about 1/2" in order to reduce the diameter just a tad.  A different drum or a different brand of form might result in a slip fit--YMMV.
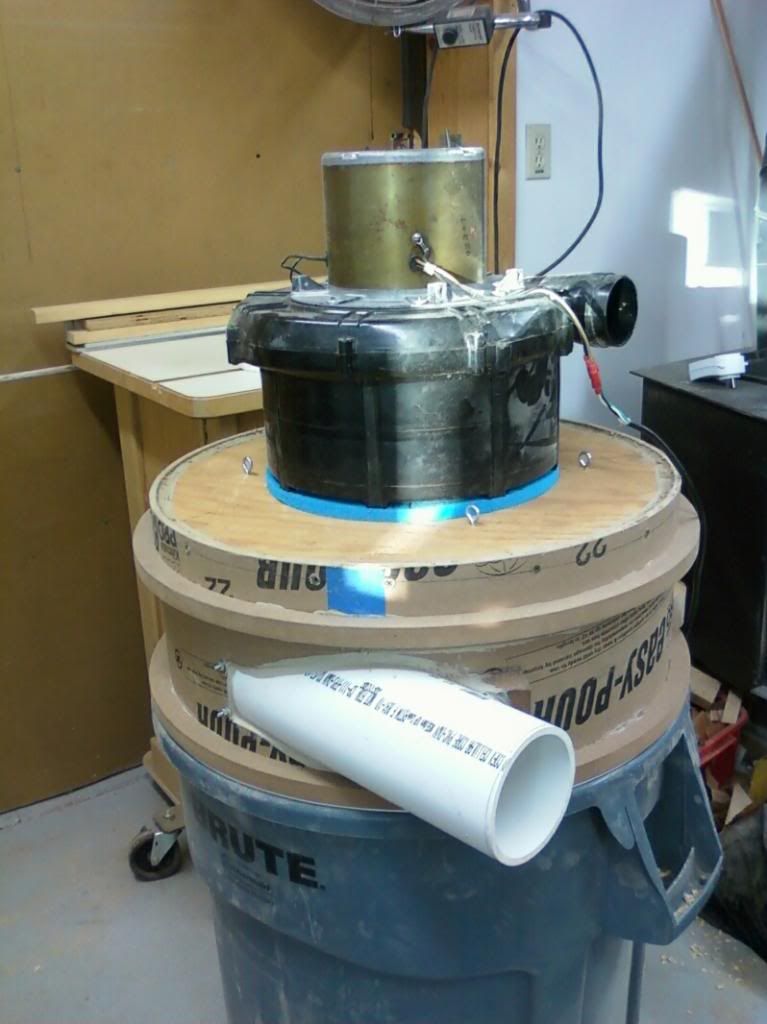
Top & bottom are 1/2" ply, top glued & sealed with OSI Quad caulk, 3/4" screws every few inches around the perimeter.  I used threaded rod spacers--I didn't trust the bottom only held along 1/3 of its circumference.

I initially wanted the "cool" factor of a clear poly chamber but in the end didn't want to deal with the hassles of taking something thin & flat & forming it round.

#2
Quote from: phil (admin) on May 03, 2013, 02:36:20 PM
Quote from: guy48065 on May 02, 2013, 09:22:40 AM
The only spot not caulked is the fit of the chamber to the drum.  It's a snug fit but I'm sure some air leaks in.

Is the top hat just pushed down into the garbage can?  That has to be perfectly sealed.
The top pushes down into the can.  It's sized to be snug but not a force fit so I'm sure there's some slight leakage.  I assumed leakage here would be of no consequence other than the minimal reduction in CFM.  I've also read older posts about leaky tophats where there were no complaints of negative efficiency (more dust going to filter than taken in at inlet).  I guess I drew the wrong conclusions from this.

Adding a 1/2" ring + weatherstrip under the inlet pipe should still leave me with enough wall down inside the can.  The hope is that I can do this and not have to start over with a new build.

I'm sure getting a lot of unexpected use from the circle-cutter jig I built for my bandsaw :)

#3
Can it be posted here?  I'd like to see if there are any answers to the failure of my small-blower tophat.
http://www.jpthien.com/smf/index.php?topic=866.0

#4
It's already a snug fit--how would sealing it up tight keep dust from being pulled from the can into the chamber?  I'm just not "getting" the cause of the reverse flow.  BTW the can is empty except for an inch of dust so there's some serious activity in there to re-animate it and move it from a low pressure zone to a high pressure zone.
#5
The only spot not caulked is the fit of the chamber to the drum.  It's a snug fit but I'm sure some air leaks in.  The only way to fix that is to rebuild it with a gasketed sealing ring.  That was my intention but during a brain fart I cut the inlet into the wrong side of the chamber so I had to flip it over.  There isn't enough chamber height to add a ring below the inlet pipe.  I can't save anything except the baffle plate because everything is glued together with Quad Caulk.  Fortunately the materials are very cheap.  This has taken the wind out of my sails --mostly because I don't understand why it doesn't do what it's supposed to.  I feel that I'll end up in the same place if I rebuild it.  Honestly I got so little bypass when this was a simple separator that the first "filter" was just a tube sock--and I never needed to empty it.

Could it be a mis-match between the blower & chamber capacities?

#6
I'm pretty disappointed in the performance so far.  This is a pic of the chamber before attaching the baffle.  It's an 8X22 chamber with a 4" inlet & 3" outlet.  1 1/8" slot.  A 3-stage 12" radial blower sits on top.  If memory serves the blower/motor is rated for 600CFM at 12" static.  I flared the chamber outlet & located the rim 1 pipe diameter from the baffle.  The baffle is 1/2" ply with the edge tapered.
I forgot to take pictures of it assembled so that will have to wait.  Anyways with an open intake I see dust swirling around endlessly inside the chamber so it's pulling that up from the drum below.  If I add chips they do thin out in the chamber--but not instantly as I had hoped.  Tested with fine powder like MDF dust, a bit can be seen exiting the exhaust.  If I introduce a scoopful to the intake all at once a large amount spews out the exhaust.

I had better results with the previous incarnation which was a 20 gallon steel drum with a basic 2.5" elbow hanging from the lid in an ordinary separator configuration.
#7
I decided to go with the "cheap" option.  Money is a little tight and with all the recent rain I've been stuck indoors anyways so I had time to figure out the fit.
#8
If you can get it for a "steal" it could make a nice stepping stone in your DC quest.  The $200 Harbor Freight unit is very attractive for a new machine that performs great for the price.
#9
Instead of a long oblique cut to the pipe like I did to my planer hood, what if I were to insert the pipe whole into the tophat through a long oval cutout?  This would make the mouth of the inlet round like on the original baffles with the elbow inlet.  This would change the dust trajectory from tangent to the sidewall to a chord.  Would performance suffer much?
#10
I'm going to have to use rods to support my baffle--which probably means I will need to add a window or door to the tophat so I can clear any snags.  So I might as well combine the 2 by making a large curved clear flange and glue/screw the inlet pipe to it, coming off at a tangential angle.  I'll make it a bolt-on fitting so I can remove it to clear a clog, if ever necessary.
Metal forming is beyond my capabilities so the pipe will need to be wood or PVC.  I made a hood to cover the dust slot on my Unisaw, and a hood for a portable planer like this before and the only challenge is securing the pipe to the flange so it won't break off if it gets knocked.  This will be especially important on a pipe with a hose attached.  I'll figure a way to reinforce the attachment with some ribs or something.

My planer hood:


If I felt more comfortable working with steel I might try something like this as an intake:

(Thanks to Lumberjocks.com for the idea & photo)

It's just a floor register boot and I believe I've seen them made with a deeper rectangle section that could be cut to fit the curve of the tophat, and maybe notched & flanged for attachment.  Hmmm...
#11
Is there something simpler for this simple DC?  This is really intended to be a low-buck, low-effort sucker for removing vermiculite from an attic.
#12
I'm building a small all-in-one tophat style DC for use with 3 inch (max) hose.  What sort of off the shelf items can I use for the tangential inlet?  A couple times in the past I have taken PVC pipe and bandsawed a taper & glue/screw it to a plastic flange but that method is extremely fussy--but it's cheap :)
In this instance the cut away portion would also need to be curved to match the curvature of the tophat body.  Sounds like too much trouble to me.

Do most of you fab a rectangular box & then cut that to fit the curve?  Any other nifty ideas?
#13
The video in post 3 looks like you could form thinwall pvc into the bellmouth and enlarge or reduce the other end.  Looks easy enough a caveman could do it :)
#14
Cool--I was hoping I wouldn't need to "re-invent the wheel".  Thanks to you both. 
#15
Where can I buy or how can I build a 6" ID bellmouth for my 2-stage impeller intake?  It really makes a lot of sense to me to ease the transition into the fan so I want to flare the intake--but not spend a bunch to do it.  I've considered mounting a section of 6" PVC on a lathe or drillpress & see if I can expand the mouth with a torch as it spins.  Also considered combing the aisles at Toys R Us for a plastic horn the right diameter.  Used baritones are still very expensive :) I've been eyeing kitchen departments when I'm with the wife...looking for a jello or cake mold with a large ID.  Etc.

Has anybody done this before or do I need to be the one?