News:

SMF - Just Installed!

Main Menu
Menu

Show posts

This section allows you to view all posts made by this member. Note that you can only see posts made in areas you currently have access to.

Show posts Menu

Topics - dbhost

#1
I am MORE than willing to put my 55 gallon drum separator back together and use it for this test. I need data though.

My issue is this. My anemometer will only measure up to 69mph. so at the inlet of my DC, I cannot actually measure airflow, I exceed maximum measureable speed.

I have seen more than a few tests showing a Thien baffe, notably the top hat installs, but I assume others are similar, reduce airflow by somewhere around 45%.

I am wondering if the same is true with a baffle in the separator ring of the dust collector itself (post motor).

I can build and install the separator, however I have no means of measuring it if the air speed exceeds 69mph, which I expect it will / should.

What I am wondering, is has anyone done a comparison from pre, to post in ring baffle install, OR is there anyone in Houston Metro on here, that is interested in this data, that has an anemometer that can read much higher wind speeds than my puny one can that would be willing ot loan it to me or work with me to get this data?

I'd REALLY rather not buy another anemometer for this one data point. And I am pretty sure I will be able to get wind speeds at my duct ports with my existing one so no issues there...
#2
I've been using a Thien separator for years, literally well over a decade now. And only recently came across some few youtube tests / demos showing CFM drop using most notably top hat style Thien separators being more extreme compared to say the CFM drop going through a commercially built cyclone separator like a Super Dust Deputy, and ALL of the tests are on what I would call pre impeller installs.

I have seen nothing comparing to say Neutral Vanes.

Since the whole point of these builds and adds has been to improve / maintain CFM / dust collection. Has anyone been able to do actual airflow measurements when fitted with the various separator styles?

Don't get me wrong, I love the Thien separator as it is EXTREMELY effective at separation, and maintaining airflow over the long term. I am just wondering if it is the best option, and even if, are there things we can do, maybe easing corners with a router bit for example, to facilitate airflow without allowing excessive dust blowby.
#3
I am trying to improve airflow in my DC and condense my workshop as I am going to move from my garage workshop that is 18x20, and into a shed workshop that is 12x16, I need to downsize!

My current rig is an older HF 2HP DC with a Wynn 35A, and I go out of the DC via a 5" hose to a 55 gallon blue poly drum separator with a side inlet.

I want to remove the poly drum.

So plan at this point...

#1. Upgrade the pitiful stock HF impeller with a Wen impeller. Already on order.
#2. Build separator for mounting in the ring of the DC.
#3. Move my 5" connection direct to the DC bypassing the drum entirely.

This begs the one BIG question. How do I mount both the separator, AND the 35A filter?

I am assuming the 35a more or less has the one method of the turnbuckles to mount, so that leaves how to mount the separator.

So if you have done this, could I bother you to chime in and post some ideas for mounting? I am thinking about screws through the ring into the separator, and one or two threaded bars to stand off the "loose end"

#4
I figured this crowd might be interested in this. I make a shelf that I am using to hose the trash can separator for the shop vac. I had to get it out from under the table saw, and it works great.

https://youtu.be/o-UHasKSSwQ
#5
Okay guys and gals. I am functional right now, so I am not in a huge hurry to make a decision, so  I figure this would be a good time to take a look at various builds.

Has anyone done a side flip stand for a HF 2HP DC with a Thien Top Hat separator underneath it, preferrably on a 30 gallon galvanized trash can? I am looking for a 5" in, 5" out kind of rig. What are the critical dimensions to deal with? Can a can liner be used with this setup to make cleanup easier?

Show some pics, I'd like to get ideas how you pulled it off... Thanks.
#6
I am working on maximizing my shop space, which means redesign of my dust collection, including the separator.

I want to do a side flip conversion to my HF DC, and build a side inlet separator based on a 30 gallon galvanized trash can.

The biggest question is what is the best way to build that side inlet? I was thinking of doing the "box" route with a 5" port, that way I don't have to worry about cobbling the stove pipe into a funny shape...

I don't want to add the extra height of a top hat, so this seems best to me. Has anyone else done this? Any pics?
#7
I am wondering what the easiest way to set up a Thien style separator with a side inlet on a 30 gallon galvanized trash can. I have a HF 2HP DC with a Thien separator with a side inlet in a 55 gallon drum, and the drum itself is just unwieldy...

I have seen the Top Hat type builds and they look, interesting.  But how time consuming is the build actually?
#8
I have been running my HF #97869 2HP dust collector with the Wynn canister through a side inlet Thien style separator based on a 55 gallon drum with 5" in / outlets for the last couple of years. The 5" splits to 2 4" lines, one goes to the bottom side of the tools, the other goes to the top, so that I get dust collection from say the belly pan, and blade guard of the table saw etc... at the same time.

I have a project going on presently where I am taking the sheetrock in my shop down to run power and insulate the walls, so this gives me a chance to redo the whole DC setup. Which leaves me with a few nagging questions...

#1. I do know I want to side flip the motor / impeller housing. Is it better to keep it mobile, or should I just wall mount that sucker like so many of you have?
#2. Since the output from the impeller is 5", is it even worth it to upsize the main run to 6" or should I just leave the 5" in place?

The only areas I am disappointed in my dust collection are sort of dead obvious...

#1. Lathe. I just haven't figured out how to make that work at all. It is okay for sanding, as I tend to work from the bottom side when sanding, but when cutting, it's a lost cause.
#2. Sliding Miter Saw. For two reasons. The first being it's a sliding miter saw, they are pain to collect from. The second, and most important, I don't have the proper hood built yet, I am building a new miter saw workstation with a nice hood and DC during part of this power / insulation project. So miter saw collection WILL improve. But I expect it to be far from perfect.
#3. Shop Footprint of the machine and separator. Side flipping the impeller and placing the separator immediately underneath the impeller housing will fix that and eliminate several bends, and several feet of unneeded flex line which should improve my air flow somewhat.

So what do you guys think?

Side flip, cart, or wall?
Stay with 5" or upsize to 6"?
#9
I have no interest in this other than to promote Phil's baffle / separator design. There is a member at http://www.woodworkingtalk.com/f23/side-inlet-drum-thien-baffle-free-good-home-39132/#post348639 that is giving away his separator as he has gone to an internal baffle setup.

#10
so far boy does it work very well... I am wishing I had taken a different approach to marking / cutting the side inlet hole, as the main thing that is keeping it together is clear silicone adhesive caulk.

So if I had it to do over again, which I likely will. I will follow Chuck L's great advice, and trim out the pipe piece first, use it as a template, and THEN mark and cut the can... The paper template I made using Harderwoods software was simply too big...

Now after those laments. I have been able to connect the main runs, except for the floor run to the table saw, and test. I do not have any measurement tools to test with, just seat of the pants kind of thing by picking up a measured pile of a mixture of sawdust and concrete dust (long story it was on the floor and handy...) I simply measured the time it took to pick up 4 cups of this mixture from the same spot on the floor. The first time was in my original configuration, with a 20' flex hose, the next was with the hard ducting and new config and only 2' of flex hose... There was a 15 second drop in time for the ducted network over the long flex hose. This would translate to me to mean that I am getting higher air velocities and less turbulence than if I were using the long hose still...

A few more measley steps and I will be completely done with dust collection. This is a HUGE relief!

I bet y'all want to see a picture... It's not pretty, but here it is...

#11
Well, I have the side inlet working. It's not pretty, but it works...


The hole where the 4" inlet was is now covered by that heavy aluminum HVAC tape, which seals strong, and should resist abrasion. IF I need to, I will lay my hands on some plastic sheeting, cut a plug, and epoxy it in to place. I am just trying to get functional now...

You may notice that I left the clamping ring off. Since the inlet was so high up, the clamp actually would crush the tube. I am finding no problems with it yet...

Since I really didn't know what I was doing when I cut the hole, it ended up a bit oversized, the excess gap is taken up with generous amounts of clear silicone caulk... Thank goodness this stuff is cheap...

The flex hose from the DC to the lid is making an interesting connection. The crimps in the pipe tend to make it taper, so the hose wants to slide down. For now, the hose is connected with 2 screws, and a touch of silicone to seal it up.

I have started on the plumbing as well. Since the Wye basically has to duck behind a large shelving unit that is temporarily slid out of the way, no blast gates here yet... We just make one branch go up overhead to service the workbench, and Shark Guard, and then the other go down the wall to service the rest of the shop.


Now immediately following the side branch pipe exiting from behind the water softener / reverse osmosis system, I have placed in line the blast gate to close off that line, and then the first of the Wye fittings. You can see that I am making plentiful use of the heavy aluminum HVAC tape here but, at the joints where you do not see the tape, I have sealed and secured the joint with clear silicone caulk. It makes for a strong, leak free, but still relatively easy to separate joint, plus I don't have to drill any holes for screws that way...


And yes my walls need paint, badly... But that isn't important at this point. I need to get the DC network finished, insulation blown into the wall cavities, and then get that electric run to power up everything...
#12
For all that it is worth, I am now committed to completed the side inlet. The 5" output pipe is installed and very solid, and the hole for the side pipe is in the barrel. There is a bit of a gap when my cheap Skil jigsaw blade drifted a hair, but nothing that silicone caulk can't fix. I now need to figure out how to trim and attach the side inlet pipe...I do not want it jutting out too terribly far, I have to make the connections for my 4" after the wye... and there will be a shelving unit there... What a squeeze!

Anyway, pics will be posted when this project is done for sure. There is no way I am putting THIS much work in without bragging on it a bit...

Anyone with suggestions on how best to cut / trim and attach the inlet pipe, PLEASE chime in, I need ideas yesterday!
#13
A couple of years ago, there was a group buy on the Dylos particle counters. I was hoping those that bought the meters might give us a bit of an idea if they are happy with them, and were they worth the money?

What about renting such a meter, does anyone know if particle counters are available for rent from anywhere?

Honestly, I would like to own one myself, but I want to make certain that they are worth the expense and give the user the feedback they need.

I am specifically interested in DC1100 PRO AIR QUALITY MONITOR with PC INTERFACE. I would think the PC interface would give me the opportunity to more easily monitor, and chart the impact of various dust collection improvements, and various dust producing operations in my shop.
#14
I am going from top inlet 4" to side inlet 5", just double checking before I start cutting.

Materials.

4" S&D cap to plug off current inlet hole.
Clear silicone caulk sealant.
5" x 24" 26 gauge Snap Lock Pipe segment.
5" hose clamps
5" x 10" clear flex hose to connect from HF DC to separator.

Plans.
Pipe Joint Template http://harderwoods.com/pipetemplate.php going with the following assumptions...
My drum is 23? diameter (according to the MFG specs it is?), 90 degrees for the joint angle 23? for the diameter of the main pipe, 5? for the branch pipe, and .0276? (24 gauge for sheet metal) for branch pipe thickness, with a lateral offset of 9? since I want this inletting nearly into the side.

I will set out the template, and drill / jig saw out the hole in the drum, fine tune it with a file.

Next step is to cut the 24" Snap Lock pipe to length  (6" for the outlet port, and 18" for the inlet.

Enlarge hole for outlet port, install nipple for outlet port using clear silicone.

Remove PVC elbow, grind down / shape cap to cover hole, clear silicone it into place, set aside and let cure.

Slide inlet tube through hole, making any adjustments necessary with file, mark inlet tube for cutting, keeping enough material to fold into mounting tabs.

Drill holes in mounting tab areas for mount screws, and cut away excess, and fold over mounting tabs.

Install inlet tube , secure with sheet metal screws, seal with clear silicone, let cure.

Create orientation / alignment marks on drum and lid to keep inlet and baffle oriented correctly.

Assemble baffle / lid to drum.

Remove HF 5x4x4 Wye from dust collector.

Install 5" jumper hose from dust collector to separator.

Install 5x4x4 Wye on inlet to separator.

Install hoses, and blast gates.

Test system.

Am I on the right track?

FWIW, in the long run, I am planning on going with 5" Snap Lock pipe for the main trunk, and branching with 5x5x4 Wyes to the machine drops.
#15
I would like to convert my Thien separator to use 5" duct instead of the 4" PVC presently in use. I can figure out the straight nipple by just using a short length of 5" stove pipe, but what can I use for the elbow that won't cost body parts I don't want to lose?

Kenncraft has some 45 degree long sweep elbows that look promising, but is 45 degree input sufficient or do I need 90 deg?

I guess I *could* use this as an opportunity to side inlet, but I don't feel confident enough to chop up my drum yet...
#16
Okay, so the upgrade bug has bit me in the tail. Mostly because I want to be able to pull through the separator from the Y fitting that my HF DC came with. So the thought is, right or wrong, to go in and out of the separator with 5" HVAC duct. If I bother with the upgrade, I also want to do side inlet, to eliminate the extra elbow and improve airflow. Like I said, I am thinking, either right, or wrong, that I can set up this way to pull from both top, and bottom of my table saw...

So my questions would be...

#1. Is this a stupid idea?
#2. How to best make / set up a side inlet on a 55 gallon plastic drum?
#3. Is 5" HVAC ducting workable in this?
#4. Can I use 5" for my main trunk lines, and somehow get a 5x5x4 wye to branch off to 4" S&D to make my machine drops?
#17
Phil et al.

I posted this thread originally on Lumberjocks, but felt it important enough to copy and paste the relevant sections here. The original post is here http://lumberjocks.com/dbhost/blog/14712.

So I was continuing with my planter box build tonight, and would up thinking, gee the air coming through the quick connect is sort of weak tonight, and I was verified when I made the first pass through the planer and the hose clogged up. Shut the system down, and started tracking down the culprit. It would appear that a single plastic Home Depot Bag got sucked up, somehow made its way past the Thien separator, and up to the cross piece in the impeller grate. Some cleaning was in order, and a quick blow through to get the lines cleared sucked stuff past the baffle and into the DC bag. So I emptied the approximately 2 gallons of debris, including packing peanuts, and lots of curly shavings from the planer. This all got emptied, the bag reseated, and the separator cleaned. I completed my runs with the rest of the lumber, made my needed cuts, and have since glued and pinned the assembly together,

I cut the cross piece out, not sure how smart that was, but in theory, if stuff like bags, and curly shavings don?t get caught on the impeller itself, they SHOULD get passed through to the bag. I must say to those using a single stage DC with a separator like a Thien , if you lose suction, it may be something slinky enough to bypass the separator (plastic bags, LONG shavings etc? that has the inlet jammed up like Houston traffic? Check that first!
#18
Not a knock to the baffle, but I wanted to remind folks to avoid being stupid like me...

As those that read this, and other woodworking forums regularly should know, I have 2 current Thien separators, one on a Ridgid wet / dry vac 20 gallon trash can setup, the other on a HF 2 HP DC 55 gallon drum setup. I use the HF DC so often that I kind of forget about the wet / dry vac rig until...

The story is, that I used the wet / dry vac rig until I got the HF DC / Thien rig setup, which was I guess back in September now... Now I haven't cleaned the filter in my vac since at least march. I have been through a LOT of projects in that time, and a lot of empties of the dust bin. Even after the HF DC got set up the vac setup pulled from my planer and jointer until I found some nice funnel type 2.5 - 4" adapters for them... I have probably emptied the dust bin no less than 7 times in that time...

Well, doing some shop cleanup the other day, I noticed that when vacuming behind the lathe, I lost suction, all of the sudden, and total, like the line was blocked... I checked everything, found very little in the dust bin, in all fairness hadn't used it since I last emptied it, so what I just picked up was it... Then it was on to the vac...

When I first pulled the head off the vac I knew I hadn't cleaned it in too long... there was a good coating of dust on the inside of the vac, and last time I cleaned it, I CLEANED it, by taking the hose to it... it was spotless, but again, that was last march...

I bumped the filter, not hard, just bumped it against the side of the vac, and that's when the plume came, thankfully I was in the driveway at the time... So I took the filter off, emptied the vac, and knocked and blew the dust out of the filter, took me 10 minutes, and I am sure the neighbors down the street appreciated the dust cloud...

So the moral of my story? The baffle does a heck of a great job, but do NOT ignore your filters! I would have had to stop, and clean my filters at least 4 times for every 1 time I emptied my dust bin... So 4x7= 28 versus 1 cleaning. A good deal if you ask me... Yeah, I know you "Shop Vac" brand guys can run the fine dust bags which helps a lot... My Ridgid won't take a bag...
#19
I just wanted to let folks know that I have now had the 55 gallon drum build done now for, what has it been, 5 weeks, 6 weeks something like that? I have filled, and emptied the drum I guess 4 times now, (twice has been dumping the barrel out on the floor and sucking it back up to see if I could overload the baffle, I didn't). Some things I noted.

#1. Hot glue is pretty stiff, the plastic lid from the barrel is not. The last time I removed the lid, I noticed the center pipe is getting loose. So tip for those wanting to build one of these using the plastic lid instead of building from wood. Use clear silicone adhesive sealant instead of hot melt glue.

#2. The 55 gallon drum is pretty tall, and it makes the outlet flex line make a radical turn coming out of the separator to go down to the DC impeller. My cure for this is also to save floor space. I am building a lipped stand that will stand 29" tall (Gives me about 2.5" clearance to the ceiling) to put the DC on to get it higher off the floor. I have plans to put a small, horizontal air compressor there. Got to maximize use of 3D space folks! The second item is to use a sweep, street elbow coming out of the separator to force the turn to be a more gradual turn. The higher elevation of the DC will also allow me to drastically shorten the flex hose, in turn improving air flow.

#3. There is nothing small, or dainty about this size barrel. If I had it to do over again, I am not sure I would go with this size, or 30 gallon. The 30 gallon is easier to deal with, but would fill up dramatically faster than the 55 gallon...

#4. With the number of fills / empties I have done with this so far, and the woodworking operations have been a mixed bag of sawing, sanding, turning, planing, jointing etc... If I can hook the DC to it, I did... The stuff in the dust bin currently has a mixed consistency not unlike white flour, with wood shavings mixed in about 50/50. With all of this, I still have less than 1 cup of material that made it past and into the lower bag of the DC.

Now in all fairness, even with the baffle I initially tried, I never put this DC through much use until I put the barrel into place. So I was dealing with an effectively new Wynn filter. No telling if I have enough "cake" built up on it yet... What I do know is if the fines aren't passing the filter, or getting stuck in the filter, then where are they?
#20
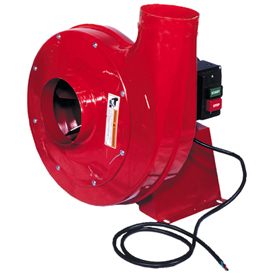
The thought occoured to me that the impeller housing / blower motor can be integrated into the lid of a Thien cyclone, and eliminate much of the resistance of the feed hose. So with my brain churning along I want to present an idea here to you guys and gals...

Start off with a known good blower motor. PSI sells some decent ones with 14" impellers, 6" inlet (and presumably 6" outlet).

http://www.pennstateind.com/store/DC250SEMB.html is the one I am thinking of. A bit pricey, but would work. Other suggested makes and models would be appreciated.

A 55 gallon drum like the one I used in my recent build.

http://www.jpthien.com/smf/index.php?topic=223.0

Side inlet as seen in so many other builds...

http://www.jpthien.com/smf/index.php?topic=196.0

With the DC on top of the lid. (Not quite like in this pic, using the side inlet should eliminate the need for the riser from the lid...

http://www.jpthien.com/smf/index.php?topic=27.0

Wynn spun bond Farr style open / open filter. Sorry no pics...

The question would be how do we connect to the filter, and provide for the inevitable amount of dust that gets past the separator section?

Commercial cyclones have a short jumper of hose, that leads to the filter assembly, with a catch pan below that on the floor.


Is there a better way of doing this?

Is this worth doing? How would the results compare to a commercially available cyclone?