
Quote from: bennybmn on March 31, 2009, 08:15:29 PMThat's been my experience so far, too. I recently planed a bunch of lumber and intentionally let the bag fill until it was about a foot from the separator. Much fuller than I'd ever let it go before. The chips and dust entered the bag, spiraled down to the bottom (the top of the pile, actually), and stayed there. No swirling after the fact. When I emptied the bag, virtually no chips or dust fell out of the filter, despite a good banging from the outside. I was impressed.
...since it prevents the churning as the bag fills up, and the filter stays cleaner, that means you get the same suction all the way till the bag fills up...
- Welcome to J. Phil Thien's Projects.
This section allows you to view all posts made by this member. Note that you can only see posts made in areas you currently have access to.
#16
Thien Cyclone Separator Lid Discussion / Re: Question for Phil and DC mounted baffle users...
April 03, 2009, 04:07:42 AM #17
Thien Cyclone Separator Lid Discussion / Re: Adding a Thien Baffle to a Harbor Freight DC
April 01, 2009, 10:50:39 PM
Thanks for the compliments, DB. Like you, I really didn't like the HF green, so I figured for the cost of a couple rattlecans I could have some fun. ;D
#18
Thien Cyclone Separator Lid Discussion / Re: Shop vac on crack!
March 31, 2009, 01:15:55 AM
Nicely done, Benny. Do you think the filter mount could have been modified to accept a shorter filter? (That might cause a hit in airflow, though.) You've got me thinking, though...dangerous thing. Right now I have a shop vac and separate 5 gallon non-Thien separator, both on wheels and always in the way. It'd make sense to save floor space by going vertical and incorporating a real separator in the process.
#19
Thien Cyclone Separator Lid Discussion / Re: Adding a Thien Baffle to a Harbor Freight DC
March 30, 2009, 03:11:07 PM
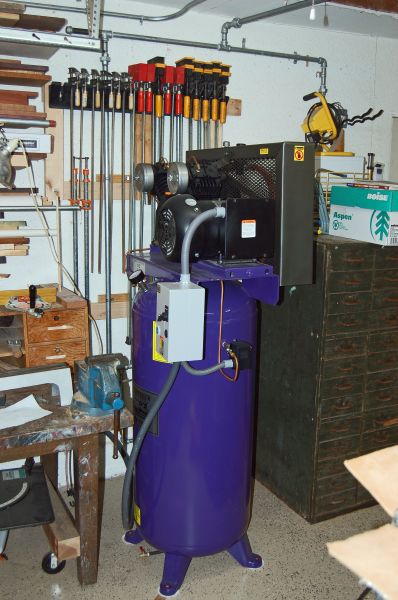
Well, I guess I'd better post a pic of my compressor...
The Powermatic lathe will remain mustard colored, though. ;)
The Powermatic lathe will remain mustard colored, though. ;)
#20
Thien Cyclone Separator Lid Discussion / Re: Adding a Thien Baffle to a Harbor Freight DC
March 30, 2009, 02:56:57 PM
Thanks for the comments. I think I've also seen something here saying the neutral vane is not necessary, but I figured I'd give it a try before removing it, since I used pop rivets to install it. So far it doesn't seem to be hampering anything, but I'm open to suggestions for things to look for to see if it is.
Like for you, floor space is scarce in my shop. That's why I decided to try this approach instead of building a free-standing separator. I figured for the cost of a 2' x 2' piece of Masonite, it was worth experimenting. (And indeed it has been.)
The inside of my inlet ring is sort of a gunmetal gray...that's how it came from China. The outside is Rustoleum purple metal flake...I wanted to have the only purple DC on the block. ;D The 'Hoover' logo on magnetic sign material just seemed necessary, somehow. ::)
#21
Thien Cyclone Separator Lid Discussion / Adding a Thien Baffle to a Harbor Freight DC
March 27, 2009, 05:22:10 AM
For the price I paid, I've been very pleased with my Harbor Freight dust collector. From the get-go I added a 0.5 micron pleated filter and a neutral vane to improve the performance. Here's the story on that part. However, every time I emptied the lower bag I had to remove the filter to clean all the embedded chips and sawdust from between the pleats of the filter. The solids were not staying in the lower bag like they were supposed to.
I'd read good things about Phil's baffle, so I decided to adapt it for my Harbor Freight DC. I wanted to see if it'd help my DC without a detached separator unit.
Here's the separator, removed from the DC and turned upside down...

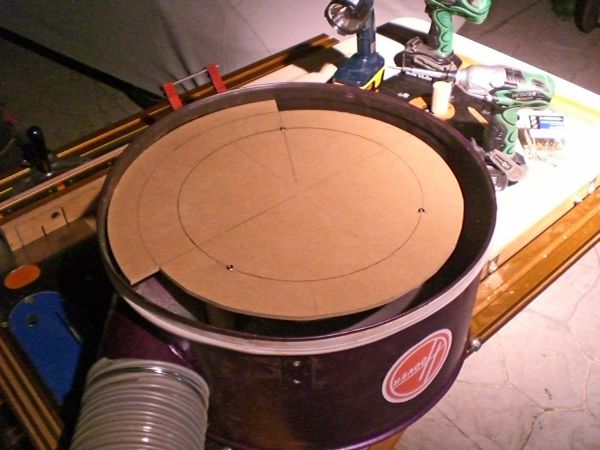
The inside diameter of the separator is 19", so I needed to draw a 19" circle on the masonite. I don't have a compass that big, but I do have a nail, a pencil, and some scrap wood...

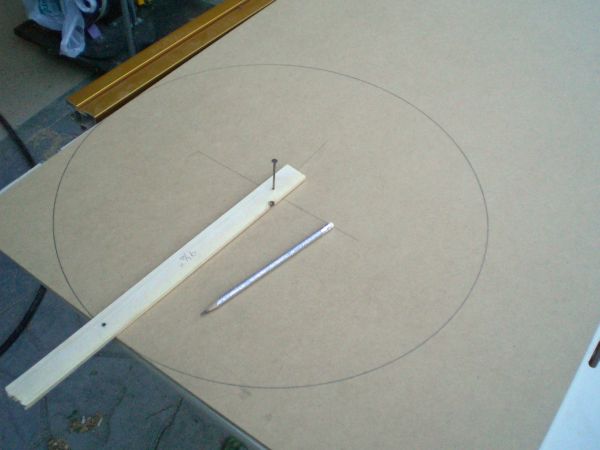
Then I needed another circle, 1 1/2" inside the first one. Same approach, just a different hole for the pencil...
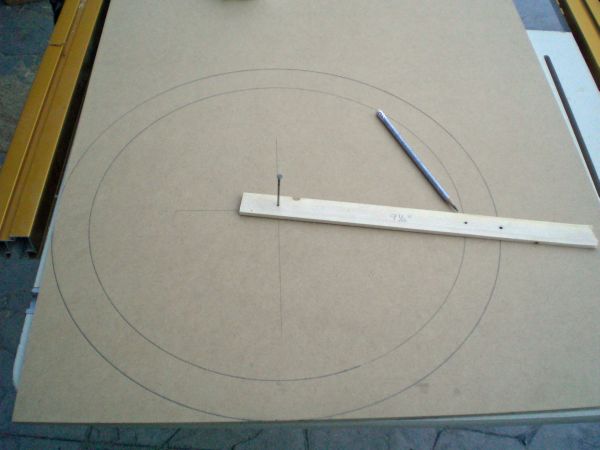
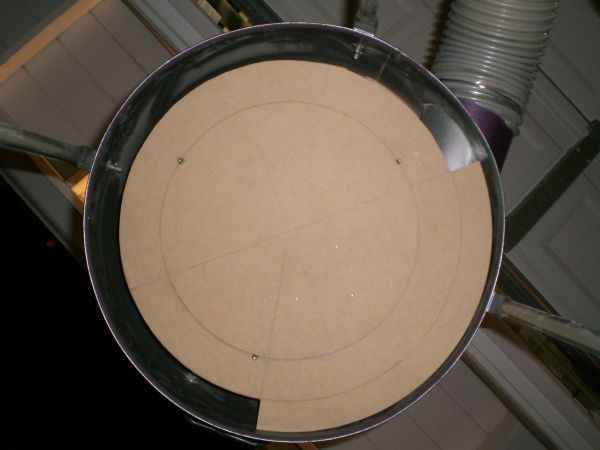
Then I laid out the 120? part of the circle...

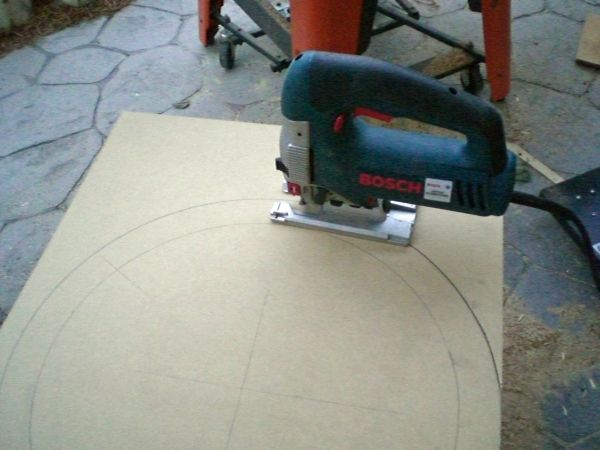
And got busy with the jigsaw...
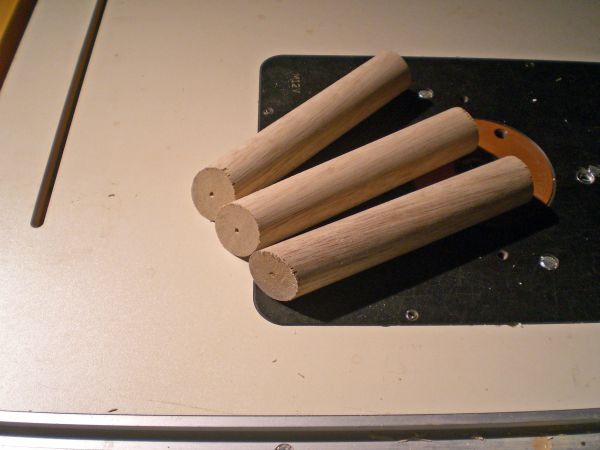
Next, I needed some standoffs to hold the baffle in place. I used some 1 1/4" (as I recall) dowel material I picked up at the Borg. I had to play around a bit to figure out the angle to cut the ends to match the slope of the separator. I have no idea what the actual number ended up being, but it worked. I also drilled the holes in the end before cutting the angle...
Then I attached them with screws at roughly equal points around the separator...

And attached the baffle to the tops of the standoffs. (Actually, it's the bottom once the separator is turned right-side up.)
And a shot of the finished installation after putting the filter back on (but before attaching the lower bag). This is looking straight up into the bottom of the separator. I had to attach the filter before installing the baffle, since with the baffle in place, I could not reach the turnbuckles that hold the filter in place...
Before I added the separator, I could walk by my DC at any time, bang the sides of the filter, and see clouds of sawdust fall off the filter and into the lower bag. I have now been through two fillings of the lower bag since I added the baffle, and although I've not removed the baffle to check the condition of the filter, I get absolutely no dust falling now when I bang the sides of the filter. My DC seems to perform better, since the filter's not getting clogged, and emptying the lower bag (and cleaning the filter) is no longer the nasty chore it used to be. It will be a bit more work to remove the filter now, because I'll have to remove the baffle first, but based on what I'm seeing so far, I won't be needing to remove the filter any time soon.
I'm very impressed with how condensed the debris stream is when it drops into the lower bag. Previously, I could see the material swirl around the bag, but with the baffle, the spiraling stream of dust and chips looks like it's being shot out of a hose. I've also nearly filled the lower bag (12" to 18" from the top of the bag) with chips from my planer, and still saw no signs of chips going into the filter.
I'll give the Thien Baffle two thumbs up. ;D
Thanks much, Phil.
I'd read good things about Phil's baffle, so I decided to adapt it for my Harbor Freight DC. I wanted to see if it'd help my DC without a detached separator unit.
Here's the separator, removed from the DC and turned upside down...
The inside diameter of the separator is 19", so I needed to draw a 19" circle on the masonite. I don't have a compass that big, but I do have a nail, a pencil, and some scrap wood...
Then I needed another circle, 1 1/2" inside the first one. Same approach, just a different hole for the pencil...
Then I laid out the 120? part of the circle...
And got busy with the jigsaw...
Next, I needed some standoffs to hold the baffle in place. I used some 1 1/4" (as I recall) dowel material I picked up at the Borg. I had to play around a bit to figure out the angle to cut the ends to match the slope of the separator. I have no idea what the actual number ended up being, but it worked. I also drilled the holes in the end before cutting the angle...
Then I attached them with screws at roughly equal points around the separator...
And attached the baffle to the tops of the standoffs. (Actually, it's the bottom once the separator is turned right-side up.)
And a shot of the finished installation after putting the filter back on (but before attaching the lower bag). This is looking straight up into the bottom of the separator. I had to attach the filter before installing the baffle, since with the baffle in place, I could not reach the turnbuckles that hold the filter in place...
Before I added the separator, I could walk by my DC at any time, bang the sides of the filter, and see clouds of sawdust fall off the filter and into the lower bag. I have now been through two fillings of the lower bag since I added the baffle, and although I've not removed the baffle to check the condition of the filter, I get absolutely no dust falling now when I bang the sides of the filter. My DC seems to perform better, since the filter's not getting clogged, and emptying the lower bag (and cleaning the filter) is no longer the nasty chore it used to be. It will be a bit more work to remove the filter now, because I'll have to remove the baffle first, but based on what I'm seeing so far, I won't be needing to remove the filter any time soon.
I'm very impressed with how condensed the debris stream is when it drops into the lower bag. Previously, I could see the material swirl around the bag, but with the baffle, the spiraling stream of dust and chips looks like it's being shot out of a hose. I've also nearly filled the lower bag (12" to 18" from the top of the bag) with chips from my planer, and still saw no signs of chips going into the filter.
I'll give the Thien Baffle two thumbs up. ;D
Thanks much, Phil.