|
Notes
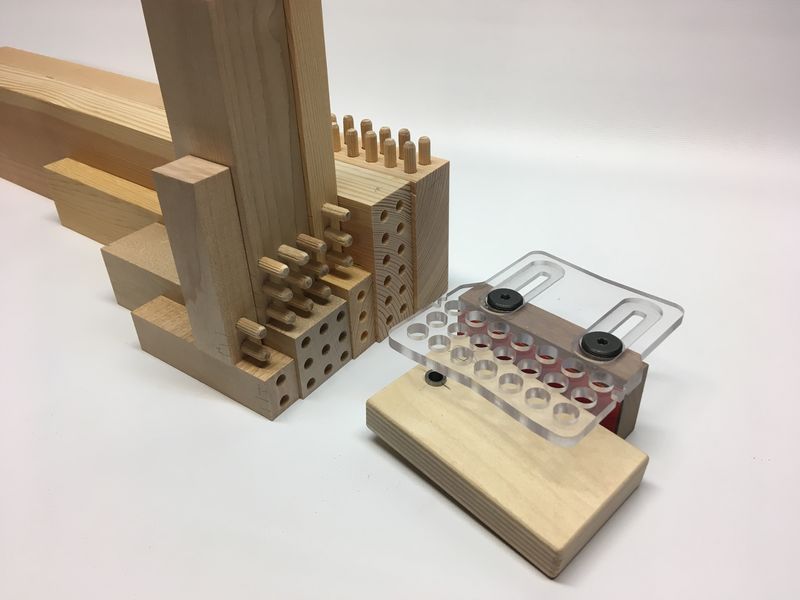
Assembly...
The unit arrives as three
pieces. Assembly is straightforward:
-
Remove the two
screws/washers from the fence, place the template on top of the
fence, and replace the screws and washers. Orient the side of
the fence with the sandpaper grip TOWARDS the holes in the template.
- These are machine
screws threaded into wood, watch the first turn or so to make sure
you catch the existing threads.
- The template may have
some plastic chips still hanging onto it. The amount of static
generated while machining plastics is something to behold.
- Yes, the holes in the
fence are slightly off-center, this is by design and allows the jig
to be used with thinner stock (allows the fence to get closer to the
template's holes).
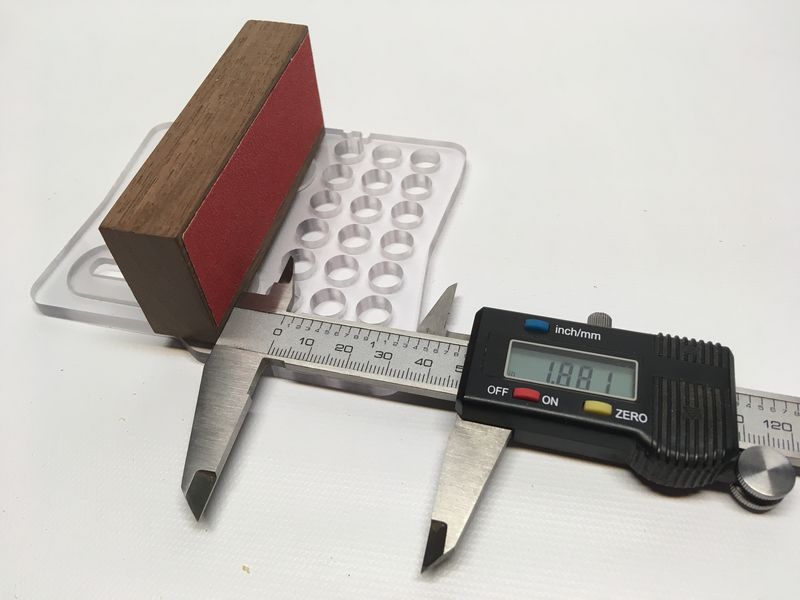
- Adjust the
fence/template for the stock you are going to use (see spacer block
example above), and tighten the screws with a 4mm Allen wrench (not included).
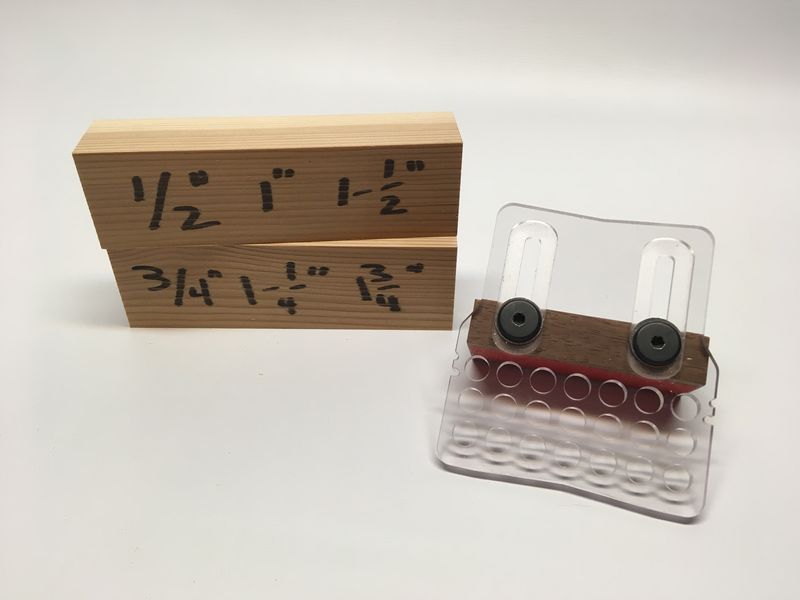
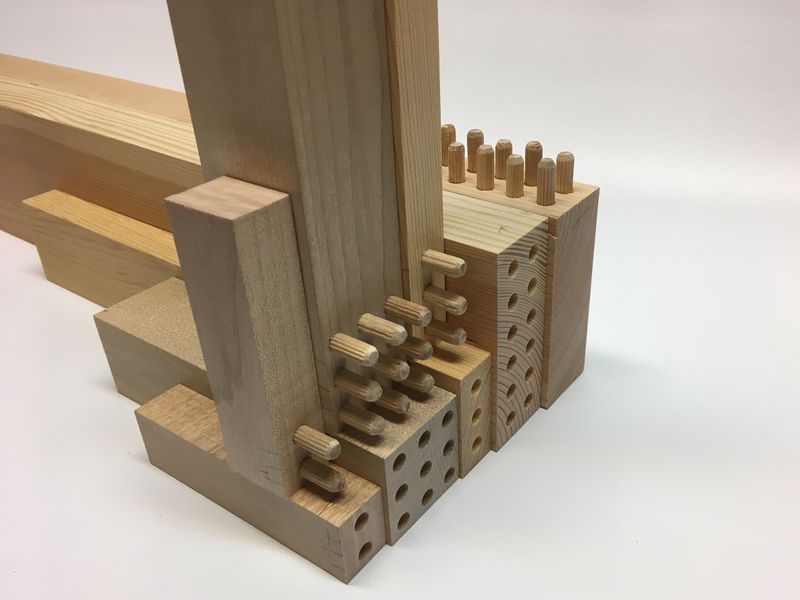
Setup blocks
The fastest and most
fool-proof method of setting the fence is to use setup blocks.
Setup blocks are merely scraps of wood (I use scraps of 2x4 material
that are 6" long) cut to the appropriate width.
So what is the appropriate
width? That depends on the thickness of your stock, and where
you'd like the holes. For the purposes of this exercise, I'm
going to assume you want your holes centered in your stock.
Find your stock thickness
in the table below, and follow it across to the setup block
width. Use a block of that width to set your fence and you will
achieve the hole pattern in the final two columns.
|
Stock
Thickness |
Setup
Block Width |
Pattern |
|
1/2" |
1-3/4" |
Single row of dowels |
|
5/8" |
1-13/16" |
|
3/4" |
1-7/8" |
|
1" |
1-3/4" |
Double row of dowels |
|
1-1/8" |
1-13/16" |
|
1-1/4" |
1-7/8" |
|
1-1/2" |
1-3/4" |
Triple row of dowels |
|
1-5/8" |
1-13/16" |
|
1-3/4" |
1-7/8" |
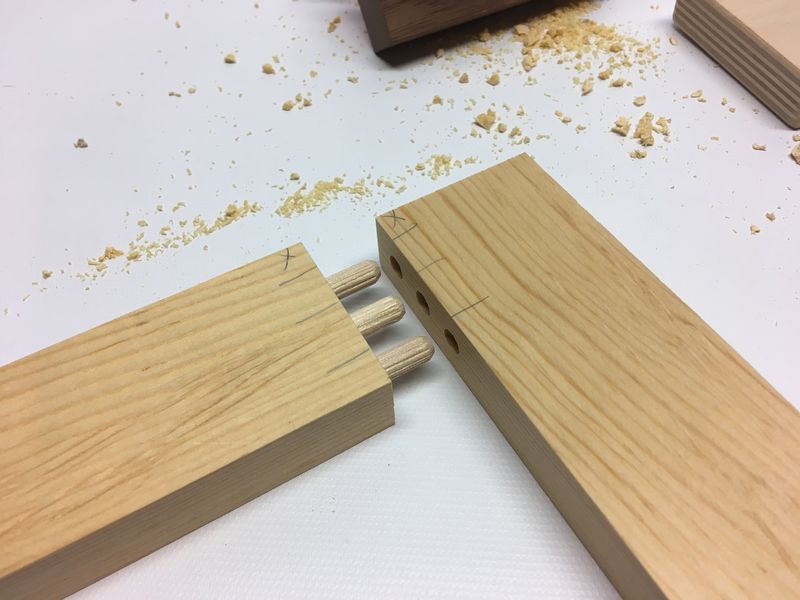
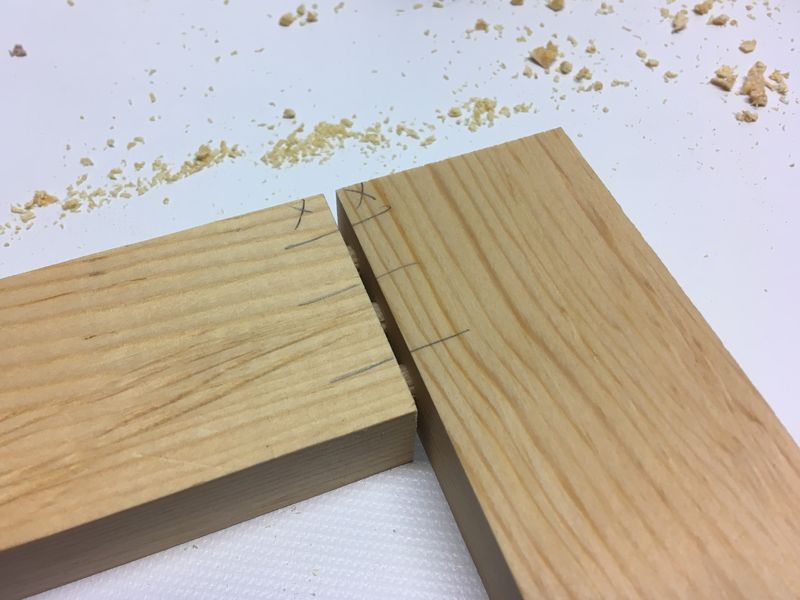
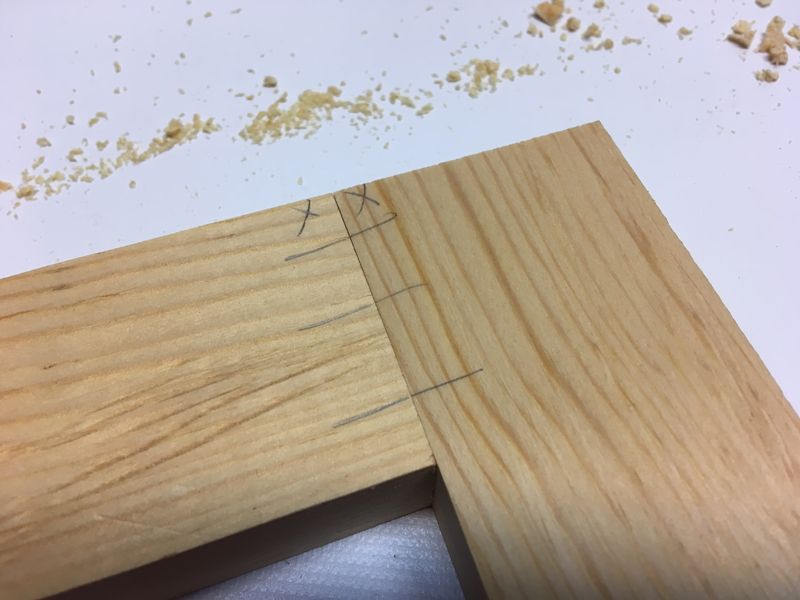
Aligning your workpieces
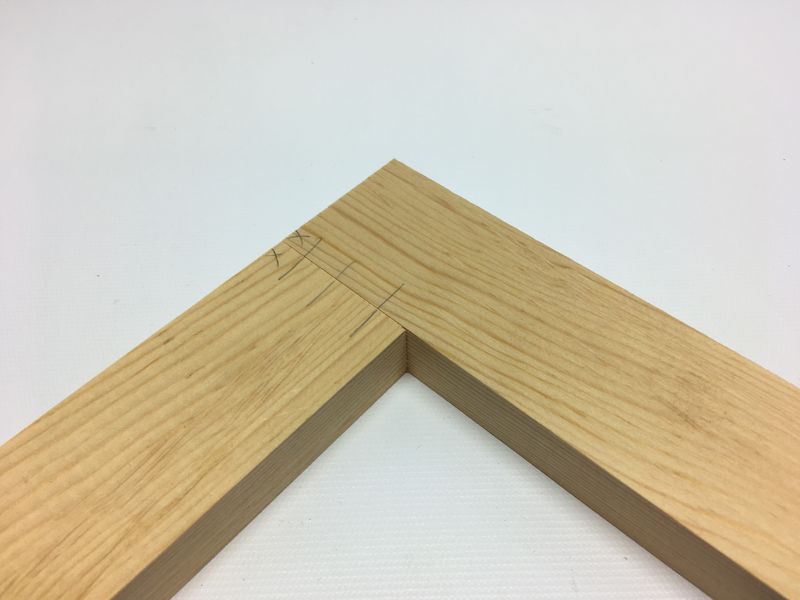
Get everything laid-out
properly and mark your pieces, do not skip this step as it is easy to
lose your orientation when moving pieces/drilling holes.
Also, your workpieces
should come nicely together when performing the initial layout and
marketing. If ends and edges of your workpieces are not square,
fix that now.
Do holes need to be
perfectly centered in the stock?
Absolutely not! The
jig references off one face and one edge of your workpiece. If
you want your holes to be off-center and almost to the edge of your
stock, go for it.
In fact, my first doweling
jig was one of those self-centering gadgets you can still buy today
(some of them at about 2x the cost of my V2). And although it
was supposed to center the holes, it never really did. They
were a little off-center and the row of holes were always a little
less than parallel to the edge of the stock, too. It was very frustrating.
I know some say "this
is woodworking, it is close enough." Well I once needed to
make eight large brackets from 1x4 material and the joints were all
off enough that significant sanding was required. This added
quite a bit of time and frustration to the project. Mostly for
my wife, because I made her do all the sanding.
If holes needn't be
centered, why are we discussing it?
Because it is so easy to
do, why not?
And yet there are reasons
why you may not always want your holes centered. Maybe one face
of your board has a groove or other detail that would interfere with
centered dowels. So offset your holes in that case by being
creative w/ the setup blocks. It doesn't matter, you can center
or not center.
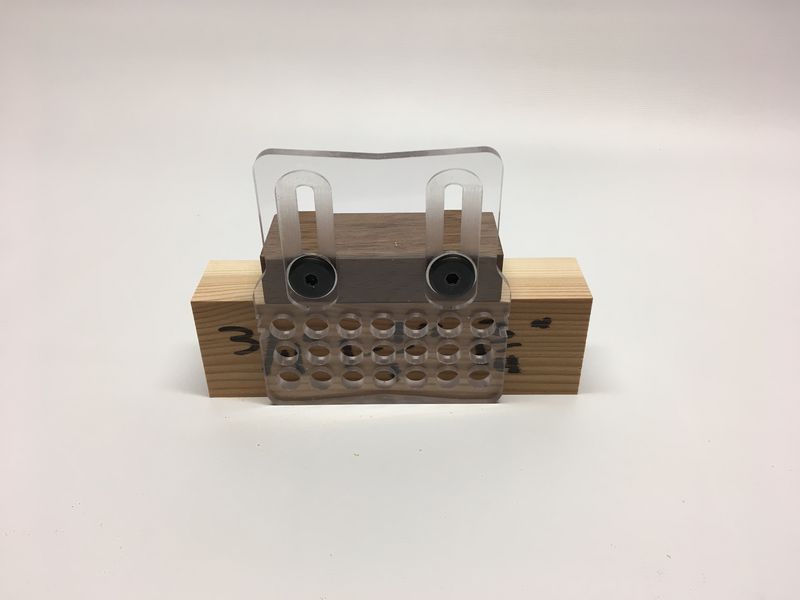
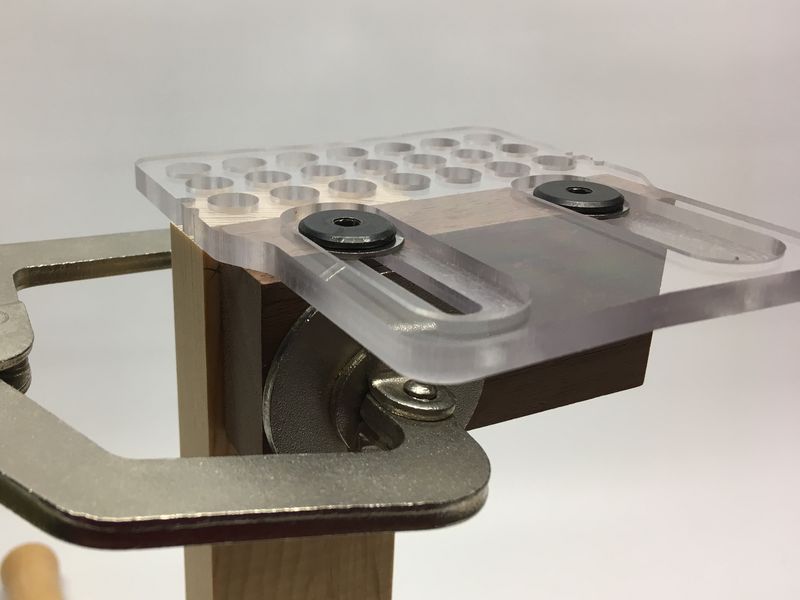
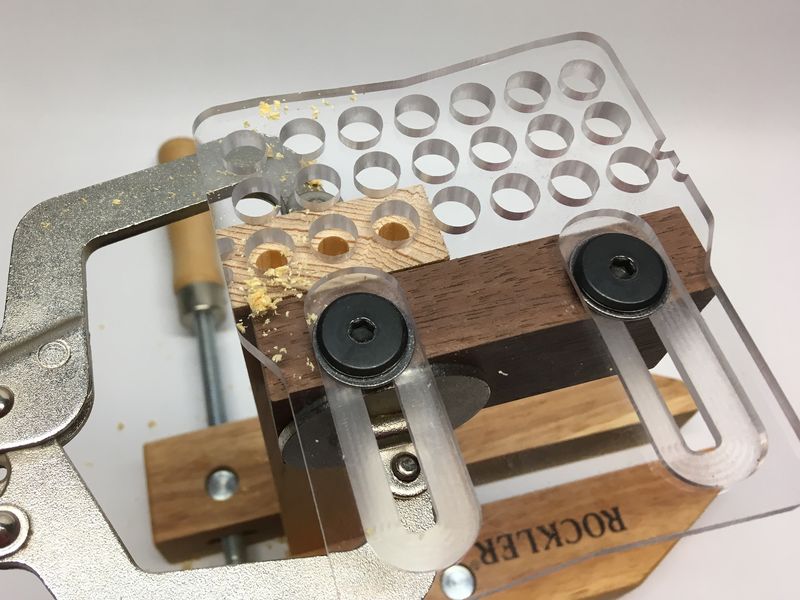
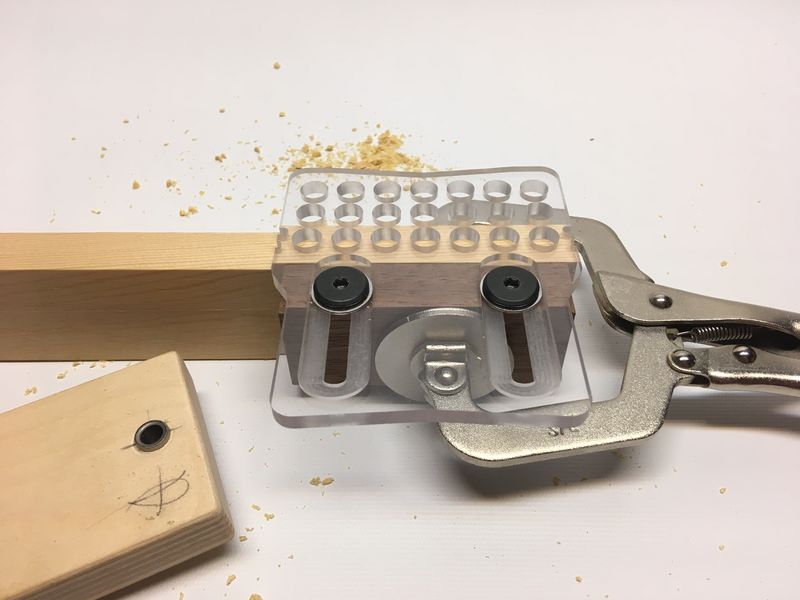
Clamping the jig
The jig usually needs to be
clamped so the edge of the plastic template is aligned with the edge
of your workpiece. I typically just use the drill bushing block
as an alignment aid. With the block held against the edge of
the workpiece, the template is slid up to the block, and the jig is clamped.
One important point is to
align the edge of the plastic template with the edge of your
workpiece. Don't use the edge of the wood fence for alignment,
use the template edge.
Quick clamps like the one
pictured above work great. Small F-type clamps are fine, too.
And yes there are times
when you'll want to make Tee-type joints. In those cases,
you'll be aligning the edge of the template with a pencil or knife
mark in your material.
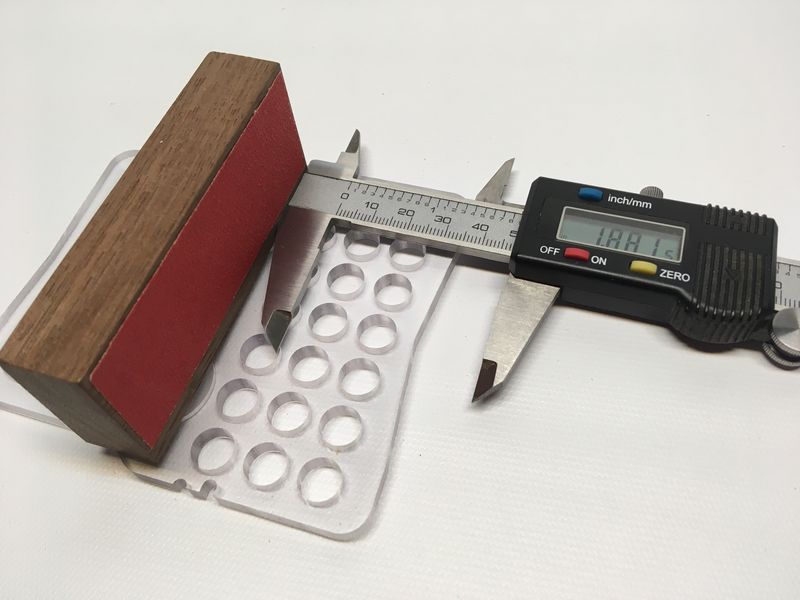
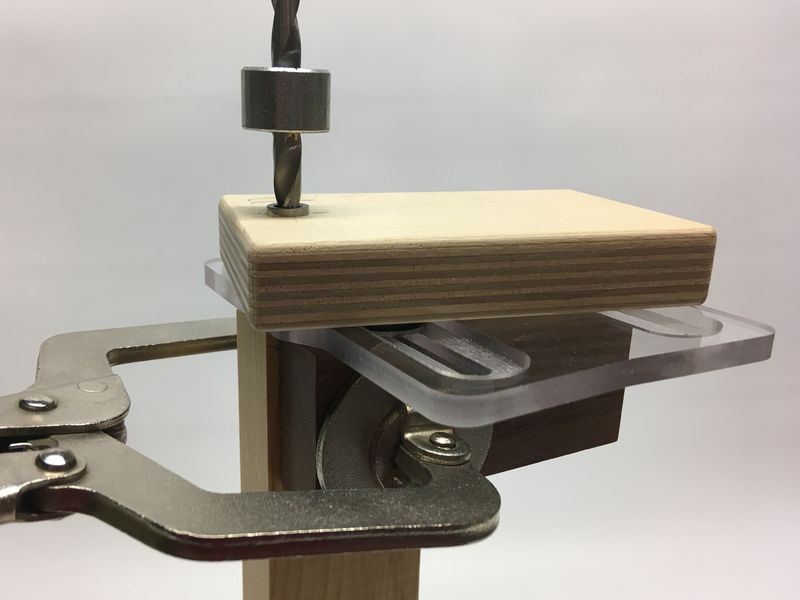
Adjusting the bushing,
if necessary
The drill bushing is
pressed into a hole in the plywood block, and isn't fastened with any
sort of adhesive. It can slide in the block with enough
pressure. To minimize tear-out, make sure the bushing is flush
with the bottom of the template.
You can do this by simply
resting the template on a scrap of wood on your bench, placing the
bushing block in one of the holes, and tapping the top of the bushing
with a wood mallet (or use a block of wood and a hammer) until the
bushing is touching the scrap of wood on which the template is resting.
Drilling holes
Give your bit a chance to
drill the hole, let the bit cut, don't be a mad-man.
Drill bits
I'm using brad-point bits
with this jig, they work great with the precision drill bushings I'm
using. I've been using a lot of soft woods like fir, and I
think the brad-points work best in these types of wood.
Stop collars
I'm using a fairly
conventional stop collar as can be seen in the pics above. I've
previously used plastic tubing, to make adjusting depths faster.
With little need to adjust, the steel collars are working fine for
me. You can find 1/4" brad-point bits for a couple of
bucks, there is little reason not to dedicate a few to the jig's use.
Testing joints
It is a good idea to have a
collection of a few looser-fitting dowels available for testing
joints. Some dowels can be so snug that you need a channel-grip
pliers to remove them (and that is without glue!). My test
dowels aren't loose, they just aren't so tight that I cannot get them
back out with my fingers.
Once you sort some dowels
to find a few looser ones, mark the ends with a colored marker so you
can find them easily enough.
I make 1-2 test joints
before starting any project, and I test the joints of my project
before assembly. This saves filling the swear jar.
Dowels: Spirals
vs. flutes
Here is a chart with your
four primary options in selecting dowel pins:
|
Type |
Intended
use |
Comments |
|
Unfluted dowel rods |
|
Typically 36" and
48" lengths found at your hardware store. Most of the
inexpensive stuff is poplar. You can also find oak fairly
easily. Take a scrap with some holes drilled in it, to make
sure the dowels you purchase aren't too undersized.* |
|
Spiral fluted |
Hardwood projects |
Intended (by manufacturers)
for hardwood projects, but I use them wherever they fit well. |
|
Straight fluted uncompressed |
Man-made materials |
Believe it or not, these
are intended for use on man-made materials (MDF, plywood, particle
board). I've used them for hardwood just fine. Again, fit
is the most important factor. |
|
Straight fluted compressed |
|
These expand very slightly
when moistened with glue. They can be a little easier to insert
into holes and grab a little better than uncompressed fluted dowels. |
*Take care if using
unfluted dowel rods, they can cause a problem called hydraulic
lock. The flutes in precut dowel pins are intended to give glue
at the bottom of the hole somewhere to go, so the dowel can be
inserted fully. It is possible to use unfluted dowels but in
that case you want to make sure you spread the glue on the walls of
the hole very thoroughly, and that you don't leave puddles of glue at
the bottom of the hole.
Furthermore, the edges of
fluted dowel pins are chamfered. This allows joints to come
together more easily.
Dowels are all too tight?
You can cook them in the
oven, or hammer them through a dowel sizer to reduce their size slightly.
Applying glue
I use 1/8" dowels to
apply glue. Squirt glue into the hole, then use the 1/8"
dowel to make sure the walls of the hole are covered. I use a
Stanley mallet with plastic head to tap the dowels into the holes if
they're too snug once the glue is in the hole. Don't go crazy
with the mallet, you don't want to mushroom the ends of the dowels
with the thing.
If inserting dowels forces
glue out of the holes, an acid brush will allow you to apply that
glue to the exposed ends of those dowels.
FWIW, this is the method
prescribed by James Krenov in one of his books. Yes, James
Krenov was a dowel-head.
Clamping
Be ready with your clamps,
they may be required to pull the joints closed. I use white PVA
glue (just Elmer's white glue) for my dowels because it seems to give
me longer open times. Determine your assembly steps before
applying the first drop of glue. If you can, assemble your
project in smaller steps to save frustration from large/complex glue/clamp-ups.
Hey, this thing is
plastic, is it durable?
Sure is, I've whipped them
at the ground repeatedly and the PETG is crazy tough stuff.
Remember that the drill bit
never touches the plastic, only the drill bushing does. So
there is no wear/tear on the template.
The fact that they're
plastic and light-weight and relatively inexpensive makes them quite
a joy to use compared to the heavy aluminum jigs I have (yes, I still
have those, I only use them for comparison purposes). You can
knock one of my jigs off the bench, pick it up, and start using it
again. I dare you to do that with a $200 doweling jig. I
double dare you.
The Thien Doweling Jig
V2 includes the precision-machined PETG template, fence, screws, and
drill bushing. The user will need to supply a 1/4" drill
bit, stop collar, clamp, and 4mm Allen wrench (to tighten the screws).
Includes a 100%
satisfaction guarantee, return it for a full refund if you aren't
completely satisfied. I will replace defective components for
as long as I'm able to produce them.

|
Ordering |
|
Thien Doweling Jig V2
includes the precision-machined PETG template, fence, screws, drill
bushing, and shipping*. The user will need to supply a 1/4"
drill bit, stop collar, clamp, and 4mm Allen wrench (to tighten the screws).
Includes a 100%
satisfaction guarantee, return it for a full refund if you aren't
completely satisfied. I will replace defective components for
as long as I'm able to produce them.
*Shipping within the U.S.,
let me know if you need one shipped elsewhere and we can figure it out. |
$50.00
|
|
Thien
V2 Doweling Jig
versus the competition (a
work in progress) |
|
Product |
Type |
Positions
(Standard) |
Price
(as of 11/25/18) |
Origin |
|
Benchdog 3/8" Doweling Jig
(Rockler) |
Face/Center |
Two (2) 3/8" holes |
$19.99 |
China |
|
Dowel-it |
Centering |
Six (6) holes, 3/16 to 1/2" |
$74.99 |
USA |
|
Dowelmax Classic |
Face/Edge |
Five (5) 3/8" holes |
$249
+$65 for 1/4" |
China |
|
Dowelmax Junior |
Face/Edge |
Five (5) 3/8" holes |
$109
+$65 for 1/4" |
China |
|
JessEm Doweling Jig |
Face/Edge |
Five (5) 3/8" holes |
$129.99
+$70 for 1/4" and 1/2" |
Canada |
|
Task Premium Doweling Jig |
Centering |
Four (4) but only two
bushings each 1/4", 5/16", 3/8" |
$72.78, but have to buy
additional bushings to drill four holes of same size |
USA |
|
Thien V2 Doweling Jig |
Face/Edge |
Twenty-one (21!)
1/4" holes |
$50 |
USA |
|

 And
remember...
And
remember...